Thursday, 23 May 2013

ThrowBack Thursday: Make-Up Edition

I have been seeing a lot of "throwback thursday" post and thought it would be fun to do a make-up version! So I went back into my archives and picked a make-up look from when I first started blogging.

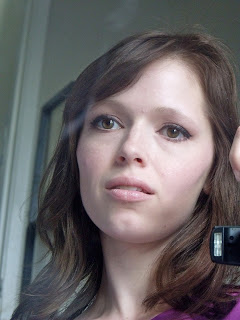
The make-up look I decided to do for my first ever throwback thursday is this one "Simple pale pink lips and Fab black liner" This is one of my first practise make-up looks with liquid/gel liner. It turned out pretty good and I was really proud!

I thought this was a good choice because it would be a good example of how my practise with make-up has improved my skill. I wanted to display my growth! It also is really pretty and I love pretty girly make-up looks in the spring!


Unfortunately I couldn't use the same palette for my new version of this look, because my daughter destroyed it....

So I decided to use a palette with similar burgundy shades and shimmer.

After so much time watching videos, and doing make-up my blending skills are much better! I made this look softer and paler but kept the pink shimmery undertone throughout. This look is also more of a wear everyday kind of look so instead of using white in the water line I went for a skin colour instead. This softened the look up even more!  Nude is such a classic way to do you lips so I opted for nude over pale pink this time just because I felt like it really. Mind you the nude lip did let me go a little brighter with the blush which ads a pretty balance to the face.


I again am proud of this look. It has a soft famine touch and really highlights all my brown features.


If you have brown eyes, brown eyes or both I totally recommend soft pinks/burgundies it is a great way to showcase you god-give features!

Down Below there are a couple close up shots. I hope you liked this idea for a blogpost! I really enjoyed doing this and think I might do it again!

Lots of Love
xoxoxx


Tuesday, 21 May 2013

Home-Made Hair Mask

I love when I can make something to use in my beauty routine! It is a lot purer and better for your hair than anything you buy. Add into that the cheaper price tag and I am all for making my own beauty treatments.

I tried out velcro rollers and man did they do a number on my fine brittle hair. I don't have strong hair to begin with, but my ends have been repeatedly colour treated so they are really fried. The rollers totally destroyed my ends so I went to my kitchen and started to whip together my favourite hair mask!

Look at all that frizz!! YIKES!! (also please excuse the outfit it was a spray park day with the kids haha)
I also did a quick oil treatment to just my tips for good measure.

First step to an oil treatment is pick an oil (I went with extra virgin olive oil) and heat it up!

Dip in the ends of your hair, but be careful it is HOT! I wrap my ends in a towel quickly when I am done to keep the hot oil off of my skin. 
Now on to the mask....


Ingredients


  • 1 egg white
  • 1 tbls of cocunut oil
  • 1 tbls of honey
  • 1 tbls of coffee grounds
*I also added in the unused oil from my oil treatment but you don't have to do that. The above ingredients are just fine.


When I mix mine all together I don't worry too much about chunks because when I put it all over my hair I use my hands and I do a final mix with my fingers then. I really don't do anything scientific when applying I start at my tips and work up to the roots of my hair. Once you hair is well covered wrap it in a towel to keep the drippings at bay and then throw a shower cap on for added protection! 

I went all out and did a face mask too haha oohhh man am I BEAUTIFUL here hehe!!!

After a half an hour (or longer it really doesn't matter) I hopped into the shower and washed my hair like normal. I let it air dry because I was feeling bad for it. I love this treatment and I do it only once a month because it takes up alot of time and effort! It is best if you can do it once a week, but try to do it as often as you can like I do.

the results are soooooo worth it!!!

I hope you liked this blogpost! Let me know if you have any favourite recipes for beauty treatments at home!! I wanna try some more asap! :D

lots of love
xoxoxx

Tuesday, 14 May 2013

Trends that Need to DIE!

Most trends I am all for and the ones I'm not well I understand them at least. There are a few trends out there that I just don't get OR that should have died off already! They got their moment now go away!!

Today I am talking about a trend that should of died off but is still around and more powerful then ever. WHAT?!?!?!?

The peplum top is the trend with whom I am directing my rage at today!

At first I totally got this trend, on certain body types it is very flattering. It is a cool famine detail you can add to any outfit. You can wear it with almost any bottom which just added to it's versatility. So like I said at first I got this trend....

BUT! there are some major flaws to this trend that make it hard to pull off.

First... finding the perfect fit right off the rack is almost impossible. You need to have it tailored or you are not wearing this top right! The flattering parts of this top is the tailored top part to your waist and then the flair out emphasizing the slimness of your waist. If it is too lose or doesn't hit you on your waist  it won't give you the slim look. A belt works for this with no tailor's fee ;)

This top isn't fitted properly so it looses it's peplumness (made up a word whoop!) IT makes her look like a rectangle here instead of flattering her skinny waist.

Second... If you are pear shaped, sporty, busty with slender hips or have a natural waist line higher or lower than average this look will not work for you. Even though it is one of those trends that claims to look good on anyone (remember skinny jeans claimed the samething ya right!) I call BULLSHIT!

sporty figure, instead of accenting curves it just makes her look more square.

Third... When has having two sets of wide hips been attractive? Yes if done right you have a skinny waist but then it looks like your hips come right out of your waist. BUT wait... You already have hips and most peplum tops come to right above your hips bringing attention to them. WHY? WHY?! do you want to have two widest parts of your body?

Do you see the two hips? Or am I just crazy? She looks so much wider then she is!

So in conclusion I think we need to band together and kick this trend to the curb! Also if you couldn't pull it off don't feel bad neither could I and technically Im the "body type" that this trend was made for o.O explain that one to me please!! Though I didn't really wanna pull this look off I never really liked it.... So maybe my personal opinion is driving this a teeny tiny little bit.

If you AGREE band with me and share this post! Spread the word and maybe someone important will listen!! (haha not likely but it will eventually go away right?)

Lots of love
xoxoxx

Sunday, 12 May 2013

Make Up: Start to Finish


Moisturized and ready for make-up

Base done! ... ooppps! forgot my brows!!

That's better!

okay... regular face so you can see how different brows make you look!

Finished eye look! Purple/Pink rose petal inspired look.

This look was so bright and fun! Perfect for a night out with the girls :D

I went with a natural cheek and lip colour so it was all about the eyes!

Hope you guys liked this post! The evolution of a make-up face :D

Lots of love
xoxoxx

Friday, 10 May 2013

Clump Crusher Flaked Out


My love hate relationship with mascara is no secret if you have read any of my other blog posts. I am always searching for the next miracle accessorized with a mascara wand. Cover Girl has NOT wowed me lately in any of the many make up categories. Which is sad because it used to be a go to for me. So when one of my favourite artists became a cover girl (p!nk) I had to give them another chance.


Cover Girl Waterproof Clump Crusher Mascara

Clump Crusher Mascara Wand

Curled Lashes with 1 coat of Mascara

Unfortunately clump crusher crushed my enthusiasm. It went on nice. I liked the wand, and it held my curl beautifully. (Waterproof of course) It was true to its name there were no clumps....flakes though, well as the day wore on they made their first appearance. Come lunch time I felt like my under eyes were wearing more mascara than my eyelashes!! It flaked so badly I had to go take it off because it was driving me crazy!!
10min of wear and 1 gentle rub with finger. Already Flaking!!

Taking away one problem (clumps) and replacing it with a new one (flakes) is not a solution Cover Girl!

I do not recommend this product. There are better non-clumping mascaras out there that don't flake out as the day goes by!

Hope this was helpful

Lots of love
Xoxoxx

Wednesday, 8 May 2013

M.I.A. Chic Mama

Hey my beautiful women out there! It has been far too long since I have blogged! Life has been getting away from me and I have been battling over some personal demons, so my attention to the digital world has been very limited. I am back now and am hoping to post much more frequently! Keep this page open for a bunch of new reviews and links to videos!!!

Lots of love
Xoxoxoxx